Selenium ChromeDriver is a software utilized for automating web interactions specifically in the Google Chrome browser. It serves as a connection between Selenium, a widely used framework for automating web tasks, and Chrome, enabling developers and testers to replicate user interactions such as clicking, typing, and browsing through pages.
Using ChromeDriver allows for efficient automated testing on Chrome, making it an essential tool for browser testing in Selenium. In this article, we will discuss the advanced features of Selenium ChromeDriver.
What is Selenium ChromeDriver?
If you are working with Selenium WebDriver and Chrome, you will need a ChromeDriver. This standalone server or separate executable helps Selenium control the Chrome browser. Without ChromeDriver, running your Selenium test scripts on Google Chrome simply won’t work. To get started, you can initialize ChromeDriver with this command:
java
WebDriver driver = new ChromeDriver();
How to Download ChromeDriver for Selenium
Downloading ChromeDriver is straightforward. Here’s a step-by-step guide tailored to your ChromeDriver version:
For ChromeDriver Version 115 and Above:
- Visit the Official Site: Head to the ChromeDriver official site to download the latest version.
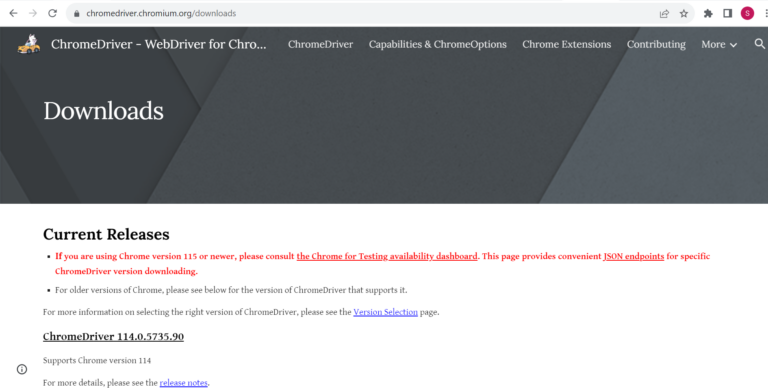
- Access the Dashboard: Click on “Chrome for Testing availability dashboard” to be directed to the Chrome for Testing Dashboard. Here, you’ll find various versions for Stable, Beta, Dev, and Canary releases across Windows, Mac, and Linux.
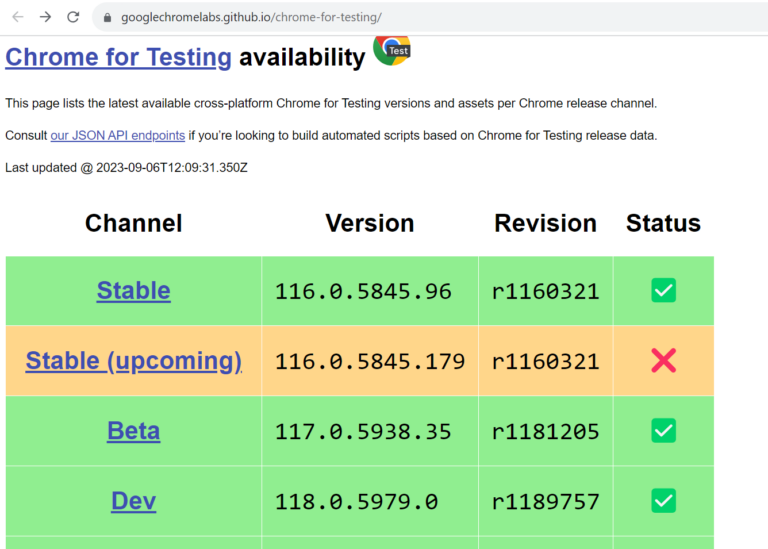
- Select the Right Version: Find the Stable link and choose ChromeDriver for your OS (Win32 or Win64 for Windows).
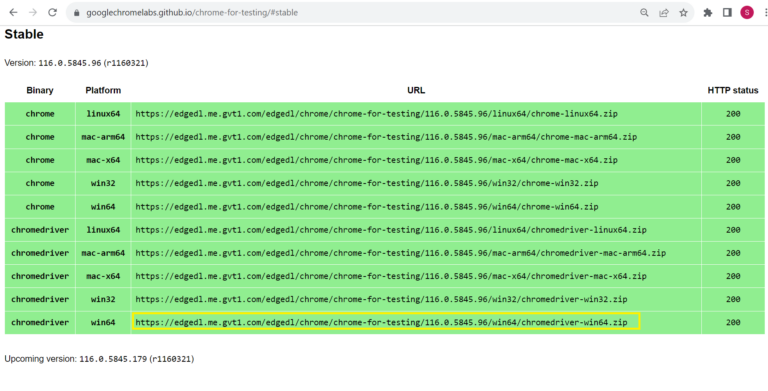
- Download and Extract: Open the URL in a new browser window to download ChromeDriver in a zip format. Extract it and place it in your preferred location, ideally at the root of your automation project.
For ChromeDriver Version 114 and Below:
- Go to the Official Site: Visit the ChromeDriver site to find both the latest and previous versions.
- Choose the Correct Version: If you are using Chrome version 114, click on “ChromeDriver 114.0.5735.90” to navigate to the download section for Mac, Linux, and Windows.
- Download for Windows: If you’re on a Windows system, select “chromedriver_win32.zip.”
- Extract and Place: Once downloaded, extract the zip file and move the contents to your preferred location, such as the root of your automation project.
- With ChromeDriver downloaded and set up, you are ready to configure it via environment variables or the System.setProperty() method in Java.
The importance of Selenium ChromeDriver in automating browsers.
There are several important reasons why Selenium ChromeDriver is a crucial tool for automating browsers.
- ChromeDriver enables Selenium to communicate directly with Google Chrome, which is among the most widely used browsers globally. This guarantees that automated tests and scripts operate in an environment that closely mirrors the real user experience.
- ChromeDriver supports the WebDriver protocol, which offers a standardized method for automated scripts to manage the browser. This enables uniform behavior and ensures compatibility with Selenium WebDriver APIs.
- ChromeDriver is capable of running JavaScript and managing dynamic content brought in through AJAX, which is essential for testing contemporary web applications.
- It functions on multiple operating systems like Windows, macOS, and Linux, enabling consistent automation on different platforms.
- ChromeDriver is consistently supported and upgraded to align with current Chrome browser versions, guaranteeing compatibility with the newest web technologies.
Advanced Features of Selenium ChromeDriver
Some of the advanced features of Selenium ChromeDriver are as follows:
- Chrome DevTools Protocol integration: Integration with Chrome DevTools Protocol in ChromeDriver gives automation scripts access to advanced browser features and debugging tools, simplifying and streamlining testing processes.
- Network interception: ChromeDriver can help you intercept and modify network requests. This means you can test different network conditions or even mock API responses, giving you more control over your tests.
- Geolocation emulation: If you need to test location-based services, ChromeDriver lets you simulate different geographic locations. This is especially handy when you’re testing apps that rely on user location.
- Mobile device emulation: You can emulate various mobile devices directly through ChromeDriver. This makes it simple to check your site’s responsive design and mobile-specific features without needing physical devices.
- Custom Chrome flags: For those advanced testing scenarios, ChromeDriver allows you to pass custom Chrome flags, letting you adjust the browser’s behavior to suit your specific testing needs.
- CDP events: You can use ChromeDriver to listen to and respond to different browser events, giving you more control over your automation process and allowing you to fine-tune your tests.
- Performance logging: If you’re focused on your app’s speed, ChromeDriver can log detailed performance metrics, helping you spot performance bottlenecks or regressions in your web applications.
- Automatic downloads handling: You don’t have to worry about manually handling downloads anymore—ChromeDriver can automatically manage file downloads, which is perfect when you’re testing download functionality.
- Proxy settings: If you’re testing how your application behaves through different networks, ChromeDriver offers advanced proxy configuration options that you can use to simulate various network setups.
- Execution tracing: ChromeDriver can generate execution traces, allowing you to analyze the browser’s behavior during your tests and understand what’s happening under the hood.
- Bidi (Bidirectional) mode: With the recent versions, you can enjoy two-way communication between your test scripts and the browser, which enables more dynamic and interactive testing scenarios.
- CDP-based authentication: If you’re dealing with complex login processes, ChromeDriver can handle multi-factor authentication scenarios using the Chrome DevTools Protocol.
- WebSocket support: Need to test WebSocket connections? ChromeDriver has you covered by letting you automate and test these connections within your web apps.
- Service worker interception: When testing Progressive Web Apps (PWAs), ChromeDriver allows you to intercept and modify service worker requests, helping you ensure your app’s behavior is on point.
Some of the bonus key features of Selenium ChromeDriver:
- Handling Browser Notifications and Popups: ChromeDriver can take care of browser notifications and pop-ups for you, automating actions like dismissing or interacting with alerts while you are testing.
- Headless Mode: Headless Mode allows ChromeDriver users to run Chrome without displaying the browser interface, enabling test execution without launching the GUI.
- Performance Logging and Profiling: ChromeDriver lets you track things like page load times and memory usage, helping you analyze and improve your web application’s performance.
- Support for Modern Web Technologies: ChromeDriver works with advanced web features like Progressive Web Apps (PWAs), Service Workers, and Shadow DOM, so you can easily automate tests for today’s complex web applications.
Performance Optimization with Selenium ChromeDriver
Managing Cache and Cookies
To keep your tests running smoothly, it’s important to handle cache and cookies well:
- Clear Cache and Cookies Regularly: Old cache and cookies can slow down your tests and cause inconsistent results. Use ChromeDriver’s method, like driver.manage().deleteAllCookies(), to clear them out regularly.
- Control Cache Storage: If you need to start with a clean slate each time, configure ChromeDriver to avoid using cached data. You can do this by setting up a new profile or adjusting preferences with ChromeOptions.
- Use Chrome DevTools Protocol (CDP): CDP gives you detailed control over browser settings, including cache storage. Use CDP to manage cache more precisely, which can boost test reliability and speed.
Improving Script Performance and Load Times
Make your scripts run faster and more efficiently:
- Optimize Locator Strategies: Choose efficient locators like IDs and CSS selectors instead of complex XPath queries. This speeds up how quickly ChromeDriver finds elements.
- Minimize Page Load Time: Use driver.get() with proper waits to prevent your scripts from stalling due to slow page loads. Implement implicit or explicit waits to handle dynamic content more smoothly.
- Parallel Test Execution: Run multiple tests at the same time to cut down overall testing time. Tools like Selenium Grid or cloud-based services can spread tests across different machines or browsers.
Reducing Browser Memory Consumption
Manage memory effectively to avoid crashes and slowdowns:
- Run Tests in Headless Mode: Headless mode (chromeOptions.setHeadless(true)) helps reduce memory use because the browser doesn’t have to display the UI.
- Use Browser Profiles Wisely: Start each test with a fresh user profile to avoid memory issues from leftover data. ChromeDriver lets you create temporary profiles for this purpose.
- Monitor Resource Usage: Regularly check how much memory your tests and browser are using. Adjust your scripts and browser settings as needed to prevent excessive memory consumption.
Best Practice of Using Selenium ChromeDriver
Here are some best practices for using Selenium ChromeDriver:
- Keep ChromeDriver Updated: Always use the latest version of ChromeDriver to match the current Google Chrome version. This helps avoid compatibility problems that might break your tests.
- Manage Browser Sessions Properly: Make sure to close the browser with driver.quit() after your tests. This frees up system resources and prevents background processes from running.
- Utilize Explicit Waits: Using explicit waits, such as the WebDriverWait command, is better than using implicit waits. Explicit waits enable you to wait for certain conditions, ultimately improving the speed and reliability of your tests.
- Use Page Object Model: The Page Object Model effectively structures test scripts. It helps separate test logic from page details, simplifying test maintenance.
- Handle Browser Pop-ups and Alerts: Use Selenium methods to manage pop-ups and alerts (like driver.switchTo().alert()). This keeps your tests from failing due to unexpected pop-ups.
- Set Browser Capabilities Correctly: Configure ChromeDriver with the right settings (such as disabling notifications or setting the window size) to ensure a consistent testing environment.
- Leverage ChromeDriver Logs: Enable ChromeDriver logs to get detailed information that can help you troubleshoot test failures.
- Avoid Hardcoded Paths: Use relative paths or environment variables instead of hardcoding paths to ChromeDriver. This helps avoid issues when running tests on different machines or in CI environments.
- Use Incognito Mode for Clean Sessions: To prevent tests from using cached data or cookies, start ChromeDriver in incognito mode with the –incognito argument. This ensures each test starts with a fresh session.
Using Selenium WebDriver on the Cloud
To make your Selenium testing easier and more effective, you can use cloud platforms like LambdaTest. They provide access to a range of browsers through an online Selenium Grid, which simplifies reporting and helps you make better decisions. Once you’ve set up ChromeDriver, you can enhance your testing with LambdaTest.
This AI-powered platform works with Selenium for Chrome automation, offering smart debugging and test generation features. It’s a more scalable and cost-effective option compared to setting up your own Selenium Grid, thanks to its vast online browser farm with over 3000 browser and operating system combinations.
Here’s how to get started with Selenium testing on a cloud grid-like LambdaTest:
- Set Up Your Account: First, create an account with LambdaTest.
- Get Your Credentials: After logging in, go to your LambdaTest Profile to find your authentication credentials (Username and Access Key). Set these as your environment variables.
- Replicate Your Tests: To show Selenium automation on LambdaTest, you can run the same test case you used with the local Selenium WebDriver.
- Choose Your Tools: We’ll use Java and the TestNG framework for running tests on Chrome. LambdaTest also supports various programming languages and automation frameworks. You can use their Automation Capabilities Generator to set up the browsers and operating systems you want to test on.
With LambdaTest, you can also run manual accessibility testing with Accessibility DevTools Chrome extension and automated accessibility testing with Selenium and Cypress.
Conclusion
ChromeDriver demonstrates solid performance for automation activities, boasting quick execution times and effective resource management. It offers different debugging choices and thorough logging, aiding in resolving issues with automation scripts. ChromeDriver can run Chrome in headless mode, making it helpful for conducting tests in environments lacking a graphical interface like CI/CD pipelines. Extensions and plugins can be utilized in automated testing on Chrome, which may be necessary for specific situations.
About the Author

Peter Makeshoff
Peter Makeshoff is the founder and main author of Designer Daily.